Custom Cold Air Intake (2.8 - 3.1)
Why pay $200 for a professional intake from SLP (which was designed for V8's) when you can easily make your own for about $60? Not only is it cheaper, but this way you will have a better flowing K & N air filter rather than a generic one from SLP. It is easy to make it yourself, and this installation guide will show you exactly what parts you will need, price estimates, and how it is done. This custom cold air intake will get you between 7- 10 horsepower.
__________
Parts needed:
3" PVC Pipes (~ $12 for all 4 pipes)
-90° elbow
-45° elbow
-straight pipe (exactly 9 inches long)
-adapter (one side with thread inside)
K & N Air Filter (3" cone shaped) (~ $50)
-Part # RE-0810
You can find the PVC pipes at your favorite hardware store such as Lowe's or Home Depot. The K & N Filter will have to be a special order from your local auto parts store such as Auto Zone or Pep Boy's. Most parts stores will not have the item in stock since this specific filter is meant for custom applications. It can also be found on the internet from places like Summit Racing, part # KNN-RE-0810.
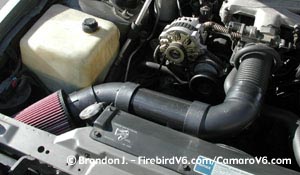
| Here is what your engine will look like after this modification. |
First, disconnect your current intake setup. You will need to take off the long plastic piece, but keep the rubber hose that connects to your throttle body. Unclip the air sensor so you can take out the air canister. Next, unscrew the remaining piece of the air sensor from the canister. On the rubber intake hose, slice off the excess rubber on the top which would normally hold a clamp in place.
Next, if you car has a computer, you will want to drill a hole for the air sensor, about 5/8" wide, into the 45° elbow. Make sure it is in the correct place. You may need to file the hole if it does not fit to allow a secure fit for the sensor. If you make the hole too big, you can always wrap electrical tape around the thread of the sensor for a tighter fit.
Now you can assemble part of your intake. Insert the adapter into the 45° elbow. Make sure you forcefully connect them, allowing a tight, secure fit. Take the K & N filter and insert the rubber opening into the threaded side of the adapter. Push the filter all the way in so it will not fall off.
It is now time to cut the straight tube to the correct size. My tube measured exactly 9 inches. I recommend you test it to make sure that is the right size for you. Place the 90° elbow on the end of the rubber intake tube and place the end with the filter in the correct place in the engine compartment. Measure the length for the straight tube.
Once you have the tube cut, you can assemble the entire cold air setup. Then place it in the engine and attach the end to the intake hose. Wrap some electrical tape at the place where the 90° elbow and rubber hose meet for added security. I could feel a very noticeable difference especially at high speeds. Now go for a drive and listen to that intake scream.
This installation guide provided by Brandon J (91Firebird). E-mail him with questions or comments.
Return to Third Generation Modifications Encyclopedia

© 2001-2005 FirebirdV6.com/CamaroV6.com. All rights reserved.
Questions or concerns? Feel free to contact us. Curious who we are? Meet the staff!
Don't forget to check out our Site Use Policies and Privacy Statement.
Interested in becoming a sponsor? Advertise with us!